Downhill hiking breaks knees. Not literally — but for those already dealing with chronic knee pain, a steep descent can turn a good trail day into a painful ordeal fast. The physics work against the hiker, the terrain shows no mercy, and poor technique compounds every problem. Fortunately, there are ways to fight back. The strategies ahead are straightforward, field-tested, and worth knowing.

Key Takeaways
- Shorten your stride and slow your pace on descents to reduce compressive forces, which can reach 7–8.5 times your body weight.
- Use trekking poles to redistribute weight, improve stability, and significantly ease joint strain on downhill trails.
- Keep knees slightly flexed while descending to relieve pressure on the patellar tendon and maintain better control.
- Strengthen quadriceps, glutes, and hip stabilizers through eccentric exercises to better manage downhill hiking forces.
- Zigzag across the trail when possible to distribute impact forces more evenly across both knees during descent.

Why Downhill Hiking Puts More Pressure on Bad Knees?
Descending a trail is where bad knees truly meet their match. Understanding knee anatomy explains why — compressive forces during downhill hiking reach 7 to 8.5 times body weight, hammering joints with every step. The quadriceps engage in eccentric contractions, fighting gravity to control each descent. When those muscles are weak, the patellar tendon absorbs the punishment, opening the door to tendonitis and chronic pain.
Tight or weak hip muscles compound the problem, throwing knee alignment off and turning a manageable trail into a grind. Terrain awareness becomes crucial here — uneven ground amplifies impact forces unpredictably, leaving compromised knees vulnerable to sudden stress spikes. Downhill hiking doesn’t just challenge endurance; it systematically tests every structural weakness the knee carries.
Strengthen These Muscles Before Your Next Downhill Hike
Preparing the right muscles before hitting a steep descent can mean the difference between a successful hike and a painful one. Targeting key muscle groups — particularly the quadriceps, glutes, and hip stabilizers — gives the knees the support they need when gravity starts working against every step. Building eccentric strength, the kind that controls movement as muscles lengthen under load, is especially critical for handling the relentless downward force of a long descent.
Target Key Muscle Groups
Strengthening the right muscle groups transforms a punishing downhill hike into a manageable one. Quadriceps control knee movement and absorb ground impact, while glutes maintain knee alignment by preventing inward collapse. Together, these muscles build the muscle endurance needed for relentless descents.
| Muscle Group | Exercise | Benefit |
|---|---|---|
| Quadriceps | Slow eccentric squats | Controls knee movement, absorbs impact |
| Glutes | Lunges, step-ups | Prevents inward knee collapse |
| Stabilizers | Yoga, balance drills | Improves proprioception on uneven terrain |
Eccentric movements, like slow squats, build quad strength under load — exactly what steep trails demand. Lunges and step-ups sharpen coordination. Balance training ties everything together, ensuring muscles fire correctly when the trail drops away beneath a hiker’s boots.
Build Eccentric Strength
Eccentric strength training targets muscles as they lengthen under load — the precise demand placed on the body during every step downhill. Step-downs, eccentric heel drops, and slow squats build the quad and hip control that keeps knees tracking true on steep descents.
Clamshells and wall sits develop glute and hip strength, stabilizing the knee when the trail drops sharply and terrain turns unpredictable. These aren’t gym novelties — they’re functional tools for anyone who demands more from their body in the backcountry.
Strength progression matters. Starting light and building load systematically conditions muscles to absorb impact rather than transfer it into vulnerable joint tissue. Consistent eccentric exercises before hitting the trail translates directly into fewer miles cut short by knee pain.
Stretches to Do Before and During Downhill Hikes
Hikers with bad knees know that the trail punishes those who skip their stretching routine, and downhill terrain is unforgiving to cold, tight muscles. A solid approach breaks the stretching process into three phases: pre-hike warm-ups that prime the knees before the first step, mid-trail stretch breaks that maintain mobility as fatigue sets in, and post-hike recovery work that prevents the stiffness from settling in overnight. Each phase targets the muscles and joints under the most stress during descents, keeping hikers moving and out of trouble on steep terrain.
Pre-Hike Warm-Up Stretches
Before hitting a downhill trail with bad knees, dynamic warm-up stretches are non-negotiable. Skipping warm up routines invites pain and injury. Dynamic flexibility keeps the knees primed and blood flowing before the descent begins.
| Stretch | Benefit |
|---|---|
| Leg Swings | Loosens hip flexors and knee joints |
| Walking Lunges | Activates quads and stabilizes knees |
| Standing Calf Stretch | Improves lower leg flexibility and knee support |
These three movements prepare the body for the punishment of steep terrain. Leg swings loosen tight joints. Walking lunges fire up the quads. Calf stretches build the foundation for knee mobility. Executing these stretches consistently before every descent separates hikers who endure from those who suffer.
Mid-Trail Stretch Breaks
Mid-trail stretch breaks separate smart hikers from sidelined ones. Stretching techniques applied during rest stops keep knees functional and trail-ready. Flexibility importance cannot be overstated when descending unforgiving terrain. Hold each stretch for 30 seconds to genuinely benefit muscle elasticity.
Key mid-trail stretches for bad knees:
- Quad stretch – targets muscles directly supporting the knee joint, reducing tightness before descent
- Standing calf stretch – relieves lower leg tension, improving stability on downhill terrain
- Gentle toe touches – engages hamstrings and lower back, boosting overall leg mobility
- Standing child pose – releases tension around the knee and hips, promoting proper alignment
These stops aren’t weakness — they’re strategy. Hikers who respect their bodies reach the trailhead again tomorrow.
Post-Hike Recovery Stretches
Recovery starts the moment boots hit the trailhead. After a demanding downhill descent, the knees need deliberate attention. Smart hikers know that recovery techniques applied immediately after a hike make the difference between hitting the trail tomorrow or sitting it out.
The Standing Child Pose delivers gentle movements that relieve accumulated knee pressure while restoring mobility. Static stretches like the Forward Step Up strengthen the knee joint directly, promoting faster tissue recovery without overloading fatigued muscles.
Skipping cooldown work costs freedom on future trails. Consistent post-hike stretching builds joint resilience over time, reducing chronic pain during both uphill and downhill terrain. Those who treat recovery as crucial preparation — not optional maintenance — keep moving longer and farther than those who don’t.
Take Shorter Steps and Slow Down on Steep Descents
Steep descents are where bad knees get punished the most, and most hikers make it worse by moving too fast with strides that are too long. Proper knee alignment and a controlled hiking rhythm make the difference between finishing strong and limping out.
Key strategies for protecting knees on steep descents:
- Shorten stride length to maintain better control and reduce joint stress
- Slow the pace to avoid loading knees with 7–8.5 times body weight
- Zigzag the trail to distribute forces more evenly across both knees
- Keep knees slightly flexed throughout each step to relieve patellar tendon pressure
Controlled descents aren’t weakness — they’re smart trail craft. The mountain isn’t going anywhere. Neither should a hiker’s knees.
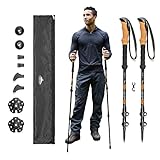
Use Trekking Poles to Reduce Knee Strain Downhill
Few pieces of gear make as immediate a difference on a punishing descent as trekking poles. Research confirms they reduce knee load by 20-25%, cutting pain and fatigue significantly. Among proven trekking techniques, poles rank highest for downhill relief.
Proper pole adjustments matter. Setting pole length to elbow height maintains posture and balance, preventing unnecessary strain. Too long or too short defeats the purpose entirely.
Plant poles deliberately with each step, letting them absorb impact before knees take the hit. On steep terrain, zig-zagging the descent further reduces force on joints, turning a brutal grade into manageable ground.
Nearly 75% of trekking pole users report noticeably less knee discomfort downhill. For anyone protecting damaged knees on the trail, poles aren’t optional — they’re crucial equipment.
The Best Footwear for Hiking With Bad Knees
Footwear can make or break a hike for anyone managing bad knees. The right boots reduce impact, protect joints, and keep hikers moving through rugged terrain without paying a heavy price later.
Key features worth prioritizing:
- Stiff soles and arch support stabilize footing on uneven ground, reducing knee stress
- Shock-absorbing insoles cut compressive forces on steep downhill stretches
- Footwear materials should be waterproof and breathable, keeping feet dry and preventing blisters that distort natural gait
- Boot sizing matters — properly fitted boots deliver cushioning and support where it counts most
Worn-out boots belong in the trash, not on the trail. Degraded support quietly increases injury risk with every step. Replacing footwear regularly is simple maintenance that protects hard-earned freedom on the mountain.
Do Knee Braces Actually Help on Downhill Trails?
Downhill stretches punish knees harder than any other section of trail, which is exactly where braces earn — or fail to earn — their place in a hiker’s kit. Research confirms that braces redistribute forces away from the joint, cutting pain on descents. Compression styles sharpen proprioception, keeping footing honest on loose, uneven ground. But knee brace types vary considerably — sleeves, hinged, and unloader braces each serve different conditions — and grabbing the wrong one delivers little benefit. Brace fitting matters just as much; a poorly fitted brace shifts, chafes, and provides false confidence. One hard warning: lean on a brace too heavily and the surrounding muscles weaken over time. Pair brace use with targeted strengthening. A sports medicine professional can match the right brace to the specific knee problem before the trailhead.
Lighten Your Pack to Take Pressure Off Your Knees
Every pound stripped from a pack translates directly into less punishment on the knees — and on steep descents, that math becomes brutal fast, with joint forces reaching seven to eight and a half times body weight.
Smart pack organization and intentional weight distribution aren’t optional — they’re survival strategy for bad knees on mountain terrain.
- Swap bulky food for dehydrated meals to shed serious ounces
- Center heavy items close to the spine for better weight distribution
- Audit every item — dead weight has no place in a pain-free descent
- Even dropping a few personal pounds lightens joint load considerably
Controlled movement downhill demands a balanced, lighter load. Those who respect this principle move freer, hurt less, and come back for more trails.
When Downhill Knee Pain Means You Need a Doctor
Lighter packs and smart weight distribution go a long way — but sometimes the knees are trying to say something no gear adjustment can fix. A proper pain assessment matters when symptoms cross certain lines.
| Warning Sign | What It May Mean |
|---|---|
| Sharp or shooting pain downhill | Patellofemoral syndrome or tendinitis |
| Swelling, redness, instability | Ligament tears or arthritis |
| Pain during routine activities | Deeper structural issue |
| Pain unresponsive to rest or ice | Specialized treatment needed |
| Ongoing discomfort over time | Risk of chronic knee damage |
A medical evaluation isn’t surrender — it’s strategy. Early intervention preserves the freedom to keep moving through wild terrain for years ahead. No trail is worth permanent damage.